Create an interactive catalog flipbook with Adobe InDesign and Heyzine
- Angelo Montilla

- Jul 9, 2024
- 6 min read
Updated: Jul 10, 2024

Creating engaging digital flipbook content can really set your brand's marketing material and communication collateral apart from the competition.
However, it can often be challenging to find the right platform to fit your project goals. In this class, I'll share another web-based digital flipbook platform I recommend that will take your Adobe InDesign projects to another level.
Follow along and learn how to create a furniture catalog in Adobe InDesign, export the pages as a PDF and convert the project into engaging flipbook content using the flipbook maker Heyzine.
To follow along step-by-step, download the lesson files by clicking the link below. There's a catalog template included that has text frames, image frames and paragraph styles built in to make the designing process easier.
Open the InDesign document included in the lesson folder and follow along in the video to go through the design process.
Before hopping over to Heyzine, let's export the PDF that will be uploaded to the platform and converted to a flipbook.
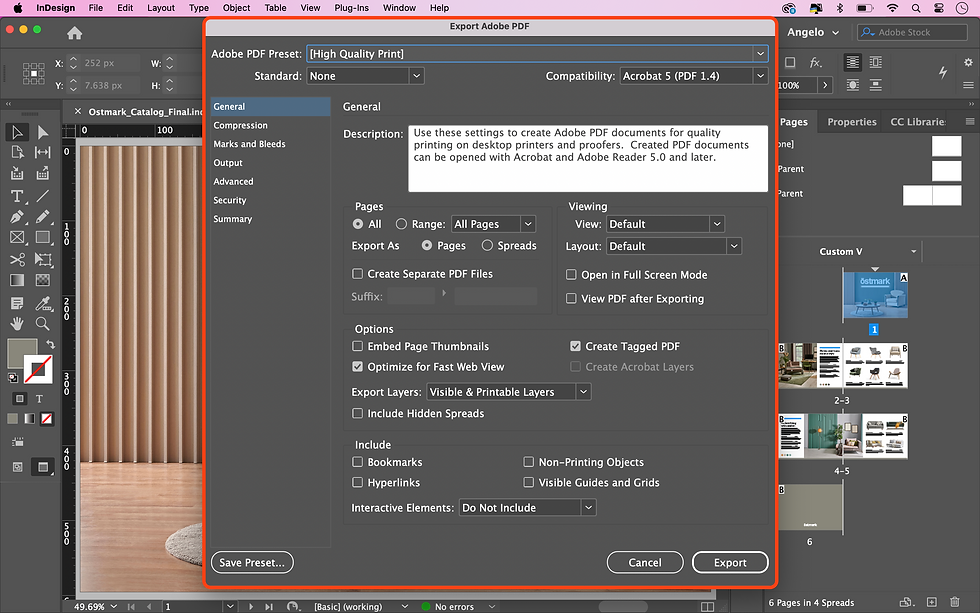
Exporting PDF
Go to File > Export.
Select the folder you would like to export the file to and in the Format dropdown, choose Adobe PDF (Print).
Under the General tab set the Preset dropdown on High Quality.
Select All Pages and export as Single Pages.
Under Options, select the Optimize for Fast Web View.
If your InDesign project has hyperlinks, select the Hyperlinks option to maintain them when the PDF is uploaded to Heyzine.
Click Export.
Once the PDF is exported, you can now jump over to Heyzine.com to create the flipbook. First, you will have to create a free account to get started. The Basic plan gives you access to 5 free flipbooks with unlimited pages, which will also allow you to follow along in this lesson.
Uploading PDF
Once logged into Heyzine, drag and drop the PDF exported from InDesign to convert it to a flipbook.
Give the flipbook project a title and select from an initial page flip effect. For this lesson, let's go with Magazine which has a nice page curl effect transition.
Click Customize.
As is, the flipbook is stunning and immediately elevates the content. However, there's much more you can do to take it to a whole new level.

You should now be in the Heyzine dashboard, where you can customize your flipbook, interface and user experience.
In the left-side menu, there are three categories – two of which we'll look at closely in this class: Style and Interactions.
Style
Under the Style dropdown, you can edit the project title, page effect, background and even add a company logo and favicon. We already set the title and effect, so let's take a closer look at the background and logo settings.
Background
If you click on Background, you can choose from built-in images or upload your own. You also have the option to choose a solid color as the main background. Choose one of the options that you like. For this lesson, we'll go with a simple grey image with a wave pattern.
By clicking the Style tab, you also have the ability to adjust the background positioning, opacity and blur settings.

Logo
Heyzine allows you to implement your brand into the flipbook projects. To do this, click on the logo option. In the lesson folder, click the Content folder and then drive into the Ostmark Logo folder.
In this folder there are two png files: ostmark_logo and ostmark_icon.
Click on Logo button and upload the ostmark_logo.png that is included in the lesson folder. You can choose the size that you like and set the positioning of the logo as well.
For this example, we'll make it small in the left corner of the interface.

You are also able to set a link to the logo – this can be done by clicking on Link and adding a company URL.
The last option is adding a Favicon – a small icon that will appear in a website tab once published. By clicking the Icons option, you can replace the Favicons for each device setting by selecting each and uploading the ostmark_icon png that is included in the lesson folder.
Here's a look at how the icons will appear once uploaded:

Controls
The last feature to highlight under Style is the Controls option, which allows users to show/hide buttons in a project and choose the UI style of the icons. This will all be based on personal preference, but for this lesson, we'll keep the default settings for controls and navigation.
Interactions
That in a nutshell are some of the cool things you can do under the Style tab. Next, let's focus on Interactions where we can add links, images and video content to the flipbook.
We'll begin with adding Links to a project. Links are more than just directing viewers to a web page. While that is certainly an option, Heyzine offers the option to link to a page within a project, link to Zoom-in on an area – perfect for a product within a catalog – or even create a pop-up window.
In the example for this lesson, let's create a popup window link to open an image and a video.
Pop-up Link
Under Interactions, click the Link option, which will launch the editing mode.
With the cross-hair cursor icon displayed, click and drag the boundary size of the link around the first chair on Page 3 in the flipbook.
You will be presented with four Action options. Choose Popup.
Under the Type dropdown, choose Picture.
Under the Style dropdown, choose Float.
Click the Set Popup Picture button and locate the corresponding image in the lesson folder. It's saved in the First Spread folder as arm chair 1.jpeg.
Click Close.
This is a great method to highlight products and give potential consumers a larger view of the item being displayed in the popup.

Next we'll create another popup window with an action to trigger a YouTube video using the same method.
This time, let's add the link to Page 4 in the flipbook.
Navigate over to the next spread and click the Link option again.
With the cross-hair cursor icon displayed, click and drag the boundary size around the first sofa featured in the product listing.
Next click the Popup action and in the Type dropdown choose Video.
In the Style dropdown, this time choose Screen so the video is opened in a popup screen rather than floating on the page.
Click Set popup video and upload the sofa preview MP4 clip that is included in the lesson folder (Note: It's important to use MP4, as MOV files are not supported).
Click save and then Stop editing to exit the edit mode.
The video popup is now active and you can test it out in the editor or view the live version online. It should look like this:

It's important to note that adding standalone images and videos to a project is done the same way. Instead of choosing Links, select one of the Image or Video options in the Interactions menu.
Sharing Options
The flipbook's UI design has been set and interactions assigned. The next question is, how do you share this for the world to see?
Depending on how you want to deliver the flipbook to your audience, there are many ways to share the project on the web or via email. Let's look at both options.
In the Heyzine editor, click the Share button in the upper-left corner. This will launch the Share window where you will see all the sharing options available. The most obvious is copying and sharing the link, but let's look at how to email and embed options.
Email Option
Click the Email/Image button and on the left side you have a few design options on how the preview will appear in the body of the email.
For this tutorial, let's choose the GIF option. You will see the preview of the flipbook GIF. To the right of it, you can copy the GIF and link together OR download the GIF itself. Let's choose the first option.
With the GIF and link copied to the clipboard, open your email client or web email app. Click on New Email and paste the GIF and link into the body of the email.

Here is how the linked GIF will appear once it's pasted inside the body of your email message.

Web/Embed
The other sharing option we'll look at is Web/Embed to share the flipbook project online.
Click the on Web/Embed option.
Choose from one of the design options on the left side. For this lesson, we'll go with the first – Embed iframe.
On the right side, there are options to adjust the Width and Height of the flipbook embed. It's helpful to leave the Responsive width option selected and only adjust the height so the experience on mobile is not affected.
Click </> Copy html code to copy the iframe code to the clipboard.
To quickly view the HTML, visit w3schools.com and paste the iframe code into the tester field and click Run. You will see a preview of the flipbook on the right side of the page.


Comments